Facebook Business Suite overview

If nothing else drove me crazy, using Facebook Business Suite—formerly Facebook Business Manager—would still make me feel insane. They change things so often that it’s absolutely infuriating.
If Facebook frustrates me, a millennial who went to college for this stuff, then I imagine people that use it less often probably have even more trouble. So, let’s take a look at Facebook Business Suite and what you need to know.
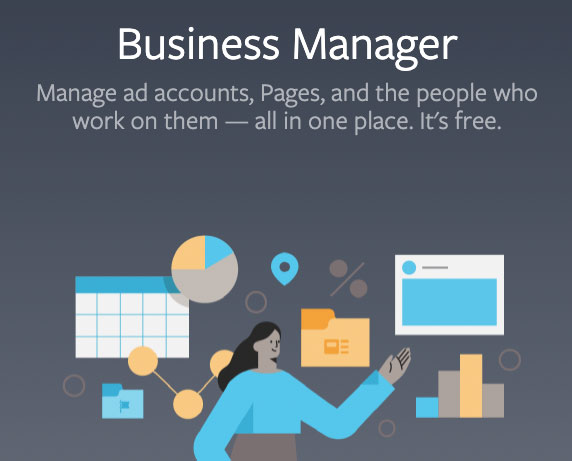
What is Facebook Business Suite?
Among other things, Facebook intended Business Suite to make it easier to manage Facebook Pages, especially for multiple businesses. It also lets you manage both Facebook and Instagram in one place, scheduling posts, monitoring notifications, keeping an eye on your inbox, and more.
It’s a great fit if:
- You want to manage Facebook and Instagram in one place
- You want to create ads
- You need to read and reply to messages from Facebook, Messenger, and Instagram
- You manage multiple Facebook Pages and their connected Instagram accounts
- You need to assign permissions to several people working together
- You want in-depth insights for both Facebook and Instagram
- You need a more secure way to manage Pages and ad accounts
- You want to be absolutely sure your business is separate from your personal Facebook profile
Suppose you want to manage your organization’s Facebook Page and Instagram account without being bombarded by posts from your friends about how amazing their vacation is. In that case, Facebook Business Suite is the tool for you.
Is there a charge for Facebook Business Suite?
You might be thinking, “That’s all fantastic, but is it something you want to pay for?”
I have great news! You don’t have to pay for Business Suite. It’s FREE, and we all love free, right? Sure, you can add your payment information—or your clients’ information if you manage their Pages—but that’s to create ads, not pay for the tool itself.
Oh, and if you didn’t know, creating a Facebook Page is free as well. If you’ve been waiting to make one because you were worried you couldn’t afford it, worry no longer!
Of course, there’s a huge advantage to hiring an agency or professional to help you with Facebook since they tend to keep up with all the latest trends and changes. And if you’ve heard that Facebook is pay-to-play, that just means you can get way more out of it by investing even just a little money. But it’s not absolutely necessary.
What can I do in Facebook Business Suite?
It’s time to dive into what you can actually do in Facebook Business Suite. As much as the tool frustrates me, it does makes certain items way easier.
Let’s take a look at some different things you can do in Business Suite. I’ll be focusing on the desktop version, as that’s the most powerful, but they also have an iOS app and a Google Play app.
Switch between business accounts
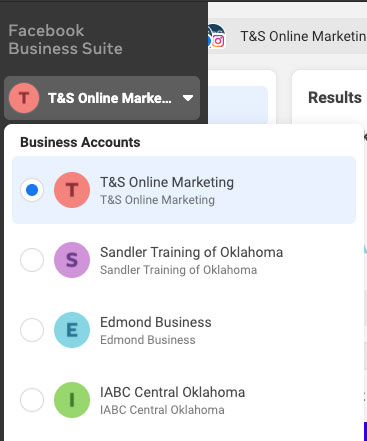
Let’s start with the basics. If you’re managing multiple accounts, it’s super helpful to know how to switch from one account to another. Start by logging in at business.facebook.com.
- At the top left, right under “Facebook Business Suite,” click on whichever business loaded by default.
- Select the other business you want to manage.
Schedule posts for Facebook and Instagram
While you can use third-party tools to schedule social media posts across multiple platforms, Business Suite will let you schedule posts for both Facebook and Instagram.
- In the left menu in Business Suite, click on Posts & Stories.
- In the top right, click the blue button that says “Create Post.”
- In the left column, select the platforms you want to post it on, enter your text (if you want it to be the same on both platforms), add or create your media (required if Instagram is selected), and optionally enter a location.
- In the center column, you can customize the posts for Facebook and Instagram (highly recommended if you’re tagging people or organizations), add a link to preview it, and add a feeling or activity.
- In the right column, check out the preview of what your post will look like, then adjust the information in the other columns accordingly. You may have to scroll horizontally and vertically to see the entire preview. Click the drop-down at the top of the column to change the different views, or toggle between Facebook and Instagram in the center column to change from one to the other.
- If you want to boost the post (this is one of the pay-to-play options), then click the little radio button next to “Boost Post.”
- If you want to publish immediately, click the Publish button. If you want to schedule your post to publish in the future, click the drop-down arrow next to “Publish” instead, then click on “Schedule Post.”
- Pick the date and time you want the post to be published. You can schedule posts anywhere from 20 minutes to 75 days in the future.
- Click the blue Save button.
- Look at the post in the Scheduled area to make sure it looks correct, especially double-checking that you picked the right date and time. It may take a few moments to appear, especially if you uploaded media. In my experience, the larger the media file, the longer it takes.
Schedule stories for Facebook and Instagram
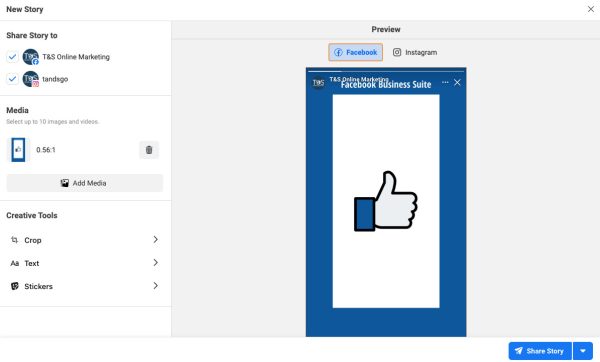
Not surprisingly, but equally helpful, you can also schedule stories for both Facebook and Instagram.
- In the left menu in Business Suite, click on Posts & Stories.
- In the top right, click the button that says “Create Story.”
- Select whether you want to share your story on Facebook, Instagram, or both.
- Drag your image, ideally with a 9:16 aspect ratio, into the “Add Media to Your Story” section.
- To add additional media, click the Add Media button. You can add up to 10 images and videos at a time.
- Use any of the Creative Tools if you haven’t already edited your media before uploading.
- If you want to publish immediately, click the Share Story button. If you want to schedule your story to publish in the future, click the drop-down arrow next to “Share Story” instead, then click on “Schedule Story.”
- Pick the date and time you want the story to be published. Once again, you can schedule stories anywhere from 20 minutes in the future to 75 days in the future.
- Click the blue Save button.
- Look at the story in the Scheduled area to make sure it looks correct, especially double-checking that you picked the right date and time. It may take a few minutes to appear. The larger the media files, the longer it takes.
Determine which post in the current year had the most reach
When planning your content, it helps to see what content you’ve already published that did well. You can look for patterns to see if you can replicate that success.
- In the left menu in Business Suite, click on Insights.
- In the left menu, right under “Insights,” click on Content.
- In the top right, it will tell you the date range you’re currently looking at. Click on the drop-down arrow to the right of that date range, then click on This Year.
- The list will most likely default to Reach. Consider clicking on one of the other columns to see which post performed well for those metrics. Depending on your goals, you may want to click on Likes and Reactions, Comments, Shares, or Link Clicks.
Plan posts for upcoming holidays
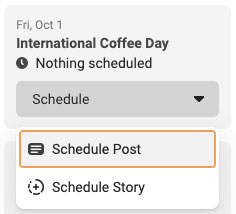
One strategy you may use for your social media is to plan content to go along with holidays and other special days. Business Suite can actually help with that!
- In the left menu in Business Suite, click on Calendar.
- Over in the right column, you’ll see Moments. It has holidays and other special days listed. Under the Moment you want to plan for, click the down arrow next to “Schedule,” then select either a post or a story.
- Adjust the time if needed, click Save, then follow the instructions I shared above.
Find the top Pages in your city
It may also help to know what the best-performing Pages in your area are doing, so you know what appeals to people close to you.
- In the left menu in Business Suite, click on Insights.
- In the left menu, right under “Insights,” click on Audience.
- Directly to the right of that left menu, right under “Audience,” it will have the options Current Audience and Potential Audience. Click on Potential Audience.
- In the top right, click on the blue Filter button.
- Under Location, start typing your city. Once a drop-down pops up, select the appropriate option.
- Scroll down toward the bottom of the page and look at the Top Pages. Click each one you want to examine.
See demographics about your audience
It’s important to know what your current audience looks like. It helps you determine what content people care about, and if it doesn’t fit your ideal target market, you may need to grow a different audience.
- In the left menu in Business Suite, click on Insights.
- In the left menu, right under “Insights,” click on Audience.
- At the top, you can see the number of Facebook Page Likes and Instagram Followers your account has.
- Just below that, you can see the age and gender breakdown of your audiences. Note that these are estimated, not exact.
- If you scroll down a bit, you can see the top cities for your audience, followed by the top countries.
- If you need to download the information to include in a report or presentation, click the Export button on the top right, then select PNG for an image, CSV for a spreadsheet, or PDF for a printable document.
See how many people are on Facebook in your target market
It’s also valuable to know how many people you could reach using Facebook if you want to. If your target marketing doesn’t have a huge presence on Facebook, you may not want to market there.
- In the left menu in Business Suite, click on Insights.
- In the left menu, right under “Insights,” click on Audience.
- Directly to the right of that left menu, right under “Audience,” it will have the options Current Audience and Potential Audience. Click on Potential Audience.
- In the top right, click on the blue Filter button.
- Enter the appropriate locations. You can add multiple locations, and it will combine the data.
- Select the relevant Age range and Gender.
- If your target audience tends to have specific shared interests, you can select those in the Interests area.
- Enter any relevant languages.
- The page will update as you enter the information. You can save your audience for quick selection by clicking the blue Create Audience button, or you can open that same audience up in Ads Manager by clicking that link on the screen.
Monitor all your messages
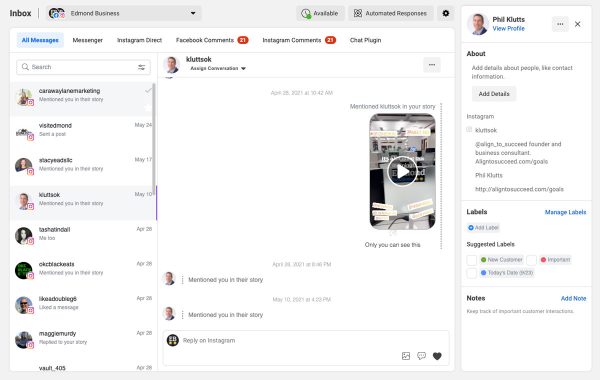
If you have a presence on a social platform, it’s essential to keep up with the messages people send you and the comments they leave.
- In the left menu in Business Suite, click on Inbox.
- Right under “Inbox” in the top left, it will have various options. It will most likely default to All Messages, which combines all the messages but not comments. However, you can click on a different tab to select another type of messages or comments.
- In the messages, you can click on a specific message to see more information about that person or organization in the right column.
- In the comments, you can reply and react to comments or boost the post that someone commented on.
Add a chat plugin to your website
Want to add a Facebook chat plugin to your website? Business Suite is where you can get the code to do that.
- In the left menu in Business Suite, click on Inbox.
- Right under “Inbox” in the top left, it will have various options. On the far right, click on Chat Plugin.
- Click on the blue Set Up button.
- Select your language, then click the Save & Continue button.
- Your website will already be entered. If it’s wrong, you’ll need to leave the setup process and edit your website address, then come back.
- Add any additional domains that will have your Page’s chat available, then click the Save & Continue button.
- Click the Copy Code button, then click the Next button.
- Add the code to your website, then click the Finish button. If you need help adding the code, simply email it to whoever manages your website, or check out Facebook’s detailed instructions for a variety of website builders.
- If you want to dive into more details, you can set up a welcome message and some pre-built options in the Start the Conversation section, or customize the appearance and some other options in the Customize Your Chat Plugin.
Adjust your page settings
Need to edit your website address, enable Top Fan Badges, or change other page settings? You can do that as well!
- In the left menu in Business Suite, click on More Tools.
- In the left menu, right under “More Tools,” click on Page Settings.
- On the new page, right under “Page Settings” in the top left, it will have various options. Each of those options may have sub-options as well. For example, your website address is under Page Info. Top Fan Badges are under Facebook Badges.
This is crazy overwhelming!
If that seems overwhelming, I understand! If you want to manage all this yourself, you’ll just need to dive in there often, and over time, you’ll get better. Also, prepare yourself mentally for frequent changes in where things are located in Business Suite.
If you want professional help instead, we would be happy to talk! Feel free to reach out to see if we would be a good fit for your needs.