Social media graphics are a great way to engage with your audience, and catch their attention. But getting started with your graphics planning can feel a little daunting at first, especially with all of the possibilities out there. You may not even know where to start, and that’s okay!
This list of tips will help you establish your goals and give you a set of basic guidelines for coming up with social media graphics for your business.
1. Keep it simple
It’s important not to get carried away with your social media graphics. You should use as few fonts and focal points as possible. Eliminate unnecessary elements from your design.
Remember that these graphics will often show up at smaller sizes across various platforms and devices; if there’s too much clutter in your design, it may be difficult for people to figure out the point to your graphic, or even read what it says.
2. Use consistent branding

Keeping the branding of your graphics consistent will not only ensure that you look better and more professional, but it will spread awareness for your brand when your graphics are shared.
You should keep your business’ standard fonts, color palettes, and other graphical elements closely at hand when designing your graphics.
This will also help gain trust from your audience because they will know what to expect when they see your online marketing.
Even if you’re just overlaying text on photos, make sure you’re consistent in how you display your logo. And if you use different fonts or colors than are consistent with your branding, be sure you have a good reason.
3. Provide helpful information

Make sure that your graphic is providing something of value to your viewers.
Introduce them to a solution to a common problem you’ve seen in your industry, show them a quick tutorial on how to do something, or simply provide them with relevant information in the form of an infographic, illustration, or screenshot.
4. Engage your audience
A great graphic should engage your audience. Whether you’re asking a question, or encouraging your visitors to get involved, you should be appealing to their emotions – connecting with them.
Think about how you want your visitors to feel when they see your graphics, and how they could maybe connect to what’s going on.
5. Optimize your graphics sizes

While it can be a time-saver to share the same size graphic across all platforms, the optimal size for your graphics is a little different for every platform, and even a little different depending on the way it’s shared.
For example, if you share an image directly on Facebook, the height of the image will match the picture that you upload.
On the other hand, if you share a link to a blog or website, the image that is pulled into Facebook from the website will be cropped down to 484 x 252 pixels.
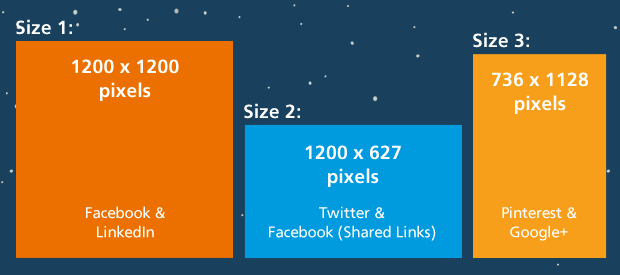
A good starting place for your graphics is to plan for three different sizes to share across your social media platforms:
- Size 1: 1200 x 1200 pixels – Facebook and LinkedIn
- Size 2: 1200 x 627 pixels – Twitter and Facebook (Shared Links)
- Size 3: 736 x 1128 – Pinterest and Google+
The first two sizes would also work on Pinterest and Google+, but since these two platforms work great with taller images, if you have the time to create a taller graphic, that will help your updates stand out even more in the feeds.
7. Use high-quality photos
The quality of your photos is a direct reflection of your business. People often skim past photos that are blurry, pixelated, or use hard-to-read color schemes.
While the best option would be to create your own photos with a professional photographer, that simply isn’t an option for everyone. Fortunately, there are a lot of professional-looking options out there that can help put your graphics above the rest.
Here are 15 Stock Photo Resources that I’ve compiled in a past blog.
Stock photos may not be the best choice in every case, but with a little bit of customization, you can add your business’ personal touch to the graphic, and make it your own.
8. Be timely & involved
Be on the lookout for new updates, products or services in your industry, and keep your audience informed. Send out a shout-out on Veteran’s Day, or start a hashtag campaign to thank all the mothers out there on Mothers Day.
Spread the word about upcoming community events, or other special events that may be relevant to your industry.
9. Convey your business’s personality

The graphics you post should reflect the personality and culture of your business, so you should look to see how you can help that shine through your social media graphics.
Some industries are a little more serious, while others are perfectly at home poking fun at themselves and their community around them.
You could get involved pop culture, if it fits your business’ personality. This could be as simple as making a fun post about National Donut Day, or yet another #ThrowbackThursday reference to Superman.
You can even give your audience an inside look at your business – show them what’s going on at the office, or what activities you and your staff are doing. This will can also make you seem more relatable and down-to-earth to your audience, and they’ll be able to connect with you more easily.
10. Make a call to action
After you’ve caught the attention of your audience, there should be a next step. Should they visit your website? Participate in a giveaway or contest? Like or share the information?
If it’s not clear what the visitor should be doing with your content, chances are they will move on. You can either put this next step directly on the image, or within the description of the attached update.
Once you have a good feel for the graphics you typically share with your audience, it will become easier to organize and plan your social media graphics schedule.


