How to create a Facebook Page

If you’re wanting to invest time or money in digital marketing, Facebook is usually one of the options that makes a lot of sense. And with 2.37 billion active users, that should come as no surprise!
While I almost never recommend a Facebook Page instead of a website, it’s definitely a must-have if you’re going to use Facebook to market your organization. Let’s take a look at the difference between an account and a Page, then how to create your Page, and finally I’ve got some tips for how to use it to market your business or nonprofit.
What is the difference between a Facebook Page and a Facebook account?
Your Facebook account is how you log in to Facebook. Each account has a profile where people can see posts that are just from you personally. You may have heard other people refer to that as their “Facebook Page,” but that’s really their profile.
Facebook says that an account is for a person, not an organization. An organization can have a Facebook Page instead. A Facebook Page is similar to a profile, but it doesn’t represent a Facebook account. However, an account with Facebook is required so you can be the administrator of a Facebook Page.
So if you want to have a Facebook Page, you do need a Facebook account. Even if you don’t plan on using the account for anything but the Page, it’s a must!
How to create a Facebook Page for your business or nonprofit
Okay, let’s get down to the nuts and bolts. How do you create a Facebook Page anyway?
I should mention that these instructions are specific to a desktop or laptop computer, not to a mobile app. I’m also assuming that this will be the main Page for your business or nonprofit.
Step 1: Log in to Facebook with your Facebook account.
Step 2: Go directly to the Create a Page section.
Step 3: You’ll see two options, which have changed from the confusing options they used to show. Now it’s just:
- Business or Brand
- Community or Public Figure

Assuming you’re creating the main Facebook Page for your organization, click the Get Started button under the Business or Brand option.
Step 4: Fill out your Page Name. This should be your business or nonprofit name.
Step 5: Start typing a category you think will fit well. Depending on which one you select, additional fields may pop up that you’ll need to fill out. For example, a Consulting Agency will have no additional fields, while a Marketing Agency will have to enter their physical location, although they can elect not to show it publicly.


Step 6: Click continue and follow the remainder of the instructions.
Remember, the more of the information you fill out, the better! In general, all digital marketing platforms like Facebook and Google Local Business will show you to more people the more information you have filled out.
At the minimum, you’ll want to:
- Upload a profile photo, usually your logo. This will typically be cropped as a circle, so be sure you upload an image that won’t look weird when it’s cropped that way.
- Upload a cover photo. Remember that this will be cropped differently on different devices, so keep any essential image elements toward the center.
- Fill out your Page Info, including your Description and additional ways people can contact you.
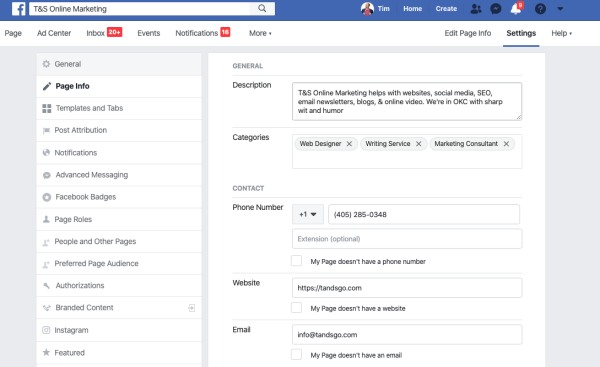
Of course, it’s a good idea to go through all the Settings and make sure everything is set up how you want it.
Note that anyone can create a Page, but Facebook does require that you’re an authorized representative of your organization to create their official Facebook Page.
Tips for marketing with your Facebook Page
Once you’ve got it up and going, it’s time to start actually using it consistently and strategically! Here are some tips.
- Don’t just make a Facebook Page to make a Facebook Page. Be sure your presence there is tied back to a specific business goal.
- Start posting content that will appeal to your ideal client.
- Post consistently! People only see around 10% of what you post, so if you’re posting once a week, that’s not often enough. Once a day and people will probably see about three of your posts each month.
- Facebook is not the place for hard selling. It’s the place to get people to know, like, trust, and value you. They’ll reach out when they’re ready to have a sales conversation.
- Use a variety of content. Links, images, and video can all be effective.
- Get some “pity likes” early on. That would include friends, family, and coworkers liking your Page.
- Once you’ve been posting for a while, you can start working on building up your audience with your ideal client. Paid ads can be great for this.
- Speaking of paying Facebook: investing time is great, but just a little money invested will get you far better results than investing no money. Paying Facebook even just $50 or $100 a month to boost posts or advertise can greatly increase the return on your investment!
- Make sure your website, email newsletters, and other digital marketing platforms you’re using now include a link to your Facebook Page.
Remember, most businesses and nonprofits can benefit from having a Facebook Page as long as they’re active after they create it. Chances are pretty good that your target market spends time on Facebook!