Having easily accessible contact information in your email signature is an important part of setting yourself up for success, and putting on a professional appearance. But now, people want more than just your phone number and address – they want to connect with you on social media!
Fortunately, adding your social media links to your email signature on Gmail is now easier than ever.
1. Log in to your Gmail account
The first step is pretty simple! Make sure you’re logged in to your Gmail account and looking at your mail screen.
2. Navigate to Settings
Click the Gear button in the top right of your screen, and then click Settings.
3. Find your Signature
Once you’re on the Settings page, you should find yourself in the General section. Scroll down about halfway, and you should see a Signature section. Select the email address you want to set up a signature for in the dropdown box.
4. Set up your Text
Add any text to your signature, if you haven’t already. Common information normally found in a signature are your name, place of business, title, office and/or cell numbers, website and address.
You can adjust the style of your signature using the toolbar above the signature box. If your business has established branding (which hopefully it does!), you can match it as closely as possible using the colors and fonts available.
5. Find your Icons
Although you can set up social media links on text, setting them up with their respective icon will help the link stand out more. Of course, there are any number of places you can grab different versions of these icons online.
Here are a few resources:
- 50+ Sets of Free Social Media Icons
- 20 Beautiful Free Flat Social Media Icons Sets For Web, Illustrator, Photoshop and More
- Simpleicon Social Media
- Free Social Media Icons from Daniel Oppel
6. Insert your Icons
In the past, you had to provide a direct link in order to add an image to your Gmail signature. Now, you can upload your images straight to your Google Drive, and use them from there. So now, let’s upload our icons!
You will have to upload the icons one at a time, though, so be prepared to do a bit of repetitive work, if you have several social media links you’re creating.
7. Link your Icons
To add a link to each of your social media icons, drag and highlight the icon, just like you would text.
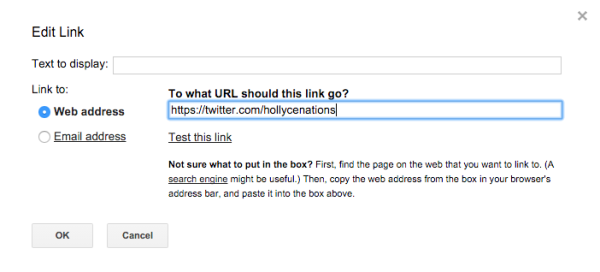
Once you have the icon highlighted, click on the Link symbol in the toolbar. This will make a little pop-up appear with the current link settings. Click on Change.
On the next pop-up, you can paste your social media link. Be sure to remove the forward slash (/) that is in the field already!
8. Save Changes
Once you’re done linking your icons, all that’s left is to save your changes at the bottom of the screen. Great job!
Remember, the easier you make it for people to stay in touch with you, the more likely it is that they’ll actually do that. And for clients, customers, and referral partners that want to connect with you on social media, following these steps makes it much easier for them!


Hi great blog, we created https://maildoodler.com to manage all of your Gmail signature within a company. No different mail signatures with different logo’s, fonts or job descriptions. Great to share these awesome signatures with your colleagues. Just easy and simple!
Very cool, Dave! I wasn’t aware of this service. Thanks so much for sharing!
Hi Holly,
I am glad that I came across your video instructions on social media icons and how to link them to my sites. Other sites I came across I seemed to have missed something and was not able to link. I did with your instructions. Thank you.